We’re living through an amazing period of innovation in Natural Language Processing (NLP) research. It has never been simpler to access state-of-the-art algorithms and technology for your own use, with amazing work from companies such as HuggingFace and Explosion (Spacy). In this two-part post, we’ll examine the use of Python with FastAPI to build a natural language processing (NLP) API.
We will learn what an API is, and we will build a Python-based API that can identify positive and negative sentiment and find “entities” such as people, places and companies from any text.
All of the code, examples, and requirements for this tutorial are available on GitHub if you’d like to follow along.
This post is inspired by my work at EdgeTier, where we build large-scale sentiment analysis and anomaly detection systems for customer service applications, processing thousands of customer and agent messages every second. While we often work with Flask as an API framework in Python, we’ve also looked at FastAPI, another lightweight and modern API framework library.
What is an API?
If you’re starting out in data science, or programming in general, the concept of an API can be difficult to grasp. You can think of an API (technically an “Application Programming Interface”) as a computer program that is built to communicate with other computer programs over the internet.

Think of the internet as a bunch of computers, often called “servers”, (just large computers) that are all connected via a network (cables / wifi / fibre all make up this network). There is often software on servers that is designed to receive “requests” from other servers – these software programs are called APIs. A “request” can be to retrieve data, store data, or update data. Very often, the requests are made using the “HTTP” protocol (the same method by which your web browser gets data, and how you got this page on your screen).
For the programming-orientated, modern APIs often send and receive data in JSON format, which is easy to read and use in almost every programming language.
Example APIs you may know
To bring this to life, here are some examples:
- Geocoding: Google provides an excellent API for geocoding (the conversion of address strings to GPS co-ordinates). These APIs are used by people who are building websites or apps that need to change location strings into GPS co-ordinates. On one of these sites, you can imagine filling in your address, and int he background ,the website makes an “API Request” to Google and sends your address string. Google sends the GPS coordinates back in the “API response”, and the app shows you a pretty map around your house. Google charges a small amount per request made to the API.
- Weather Reports: Knowing the weather right now, and knowing the forecast for a location is useful in tonnes of applications, from sailing to golf. Any application with this capability is, most likely, using an API request and response when you open it to “fetch” weather data from a Weather API before presenting it to you with a visual prompt. You can see a great example at WeatherAPI, and I’ve done work before with weather data and commuting using the Wunderground API.
- Transport: Your favourite transport planning app? It hardly knows internally the real-time location of every bus you’re searching for. In this case, you can imagine opening the application, a background task “requesting” the real time location of the bus of interest and then, with the response, showing you the point on the map. For examples, here’s APIs for Train times in India, transport in Ireland, and the SkyScanner Flight booking API.
What we’re building – An NLP API
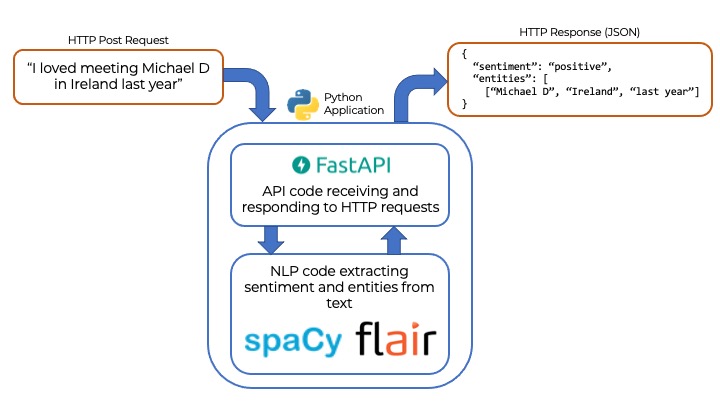
For this tutorial, we’re going to build an API that is capable of four steps:
- Receiving text via an API request (we can use a “GET” or a “POST” request, which are just different types of HTTP requests. You use GET requests all the time – your browser does a GET request for a web page every time you type a new URL in the address bar or click a link.)
- Perform sentiment analysis on the text. Sentiment analysis is the identification of positivity or negativity in strings of text. For instance, “This API is terrible” would receive a low sentiment score, and “This tutorial is the best I’ve ever seen” would score highly for positive sentiment.
- Perform named entity recognition (NER) on the text. Named entities are elements of text that refer to “named items” like people, organisations, locations, times, quantities etc. For example “I read this post on Shane Lynn’s website” should extract “Person: Shane Lynn” successfully.
- Return the results of all of this analysis in a JSON format response that can be used in other programs.
The Python library ecosystem provides toolkits for each of these steps, reducing the complexity of the operation massively. A decade ago, a toy application with this capability would have required a research team and several years to build – and you’ll do it now in less than 100 lines of code.
Library Choices – FastAPI, Spacy, Flair
Web App Framework: FastAPI
For this tutoral, we’re using the FastAPI framework to handle the “web application” part of the API. This part of the program manages the communication over HTTP and it’s where we set up the “routes” or “paths” that other programs can use to send text to the API.
FastAPI is a relatively new (2018) web app framework for Python. It promises a quick-to-start but performant method for building web APIs that automates a lot of documentation creation. I particularly like FastAPI’s use of typing for parameter validation, and the easy of use with async operators (so that you can process multiple requests at the same time).
There are other web app frameworks that can be used here, all with pros and cons, most notably in Python there are Flask, Django, Cherrypi, Tornado, and many more – all of which could be used in this demo app.
Sentiment Analysis: Flair
Flair is a python framework for NLP. Built by the Humboldt University of Berlin, Flair essentially neatly wraps up powerful NLP techniques and word embedding models to allow users to access state-of-the-art technology with a few simple commands. For those not interested in training models, Flair downloads and installs everything that is necessary and works in multiple languages.
We’re barely going to scratch the surface with Flair, and use a model for sentiment analysis. The code in Python to achieve this is very simple with Flair:
"""
A simple demonstration of sentiment analysis using the Python Flair
library.

Shane Lynn 2021
"""

from flair.models import TextClassifier
from flair.data import Sentence

# For Flair, you load models in advance.
# Note that this is memory intensive and can take some time
sentiment_model = TextClassifier.load("en-sentiment")

# We're going to analyse these two texts for sentiment
sample_text = [
    "I love using Python to make really fast APIs.",
    "I hate silly bugs that happen and annoy me."
]

# Simply iterate through the samples, and run the prediction
for text in sample_text:
    # For Flair, you convert your raw data into "sentences" prior to analysis
    sentence = Sentence(text)
    # This is the analysis step, note that it edits the sentence to include the
    # prediction
    sentiment_model.predict(sentence)
    print(f"The sentence '{text}' is detected as {sentence.labels[0]}.")
This code should output:
The sentence 'I love using Python to make really fast APIs.' is detected as POSITIVE (0.9981).
The sentence 'I hate silly bugs that happen and annoy me.' is detected as NEGATIVE (0.9856).
Flair outputs the sentiment label (positive/negative) as well as the polarity of the prediction (how strongly polarised the statement is, between 0 and 1).
Remember, sentiment analysis isn’t perfect since it’s based on a training set that may not match your text well; you will find sentences that provide incorrect results to what you expect. However, I’ve found Flair to be “generally” quite good.
Named Entity Recognition: Spacy
The final piece of our puzzle will be named entity recognition. For this, we’re using the Spacy library, another python framework for NLP applications, again wrapping pre-trained models and making them incredibly accessible to developers. Spacy is a performant and easy-to-use library that supports over 60 languages across NLP tasks such as named entity recognition, part-of-speech tagging, dependency parsing, sentence segmentation, text classification, lemmatization, and more. It is a very impressive piece of kit, built by a great company called Explosion.
Spacy works in a similar fashion to Flair; you load a pre-trained model before passing text to it and extract the results later.
"""
A simple example showing Named-Entity Recognition (NER) with the Spacy
library in Python.

Shane Lynn 2021
"""

import spacy
nlp = spacy.load("en_core_web_sm")

# Here is a sample sentence with some entities:
sample_text = "I was walking down 5th Avenue yesterday in New York City and I saw Bill Gates!"

# For Spacy, first turn your raw text data into a "document":
doc = nlp(sample_text)
# The document then "magically" has everything calculated:
for entity in doc.ents:
    print(f"Entity Detected: {entity.text}, of type: {entity.label_}")
This code segment should output:
Entity Detected: 5th Avenue, of type: FAC
Entity Detected: yesterday, of type: DATE
Entity Detected: New York City, of type: GPE
Entity Detected: Bill Gates, of type: PERSON
Spacy, out of the box, supports entity types of:
- PERSON
- NORP (nationality / religious / political group)
- FAC (buildings / streets / highways)
- ORG (companies / institutions)
- GPE (locations /countries / cities)
Note that we could use the NER capabilities of Flair in our API instead of Spacy for simplicity and memory efficiency (this simple app will be very memory intensive since we’re loading two language models – approximately 800mb – 1 GB). However, for the sake of demonstration, I wanted to show both Spacy and Flair in action.
Wrapping the Sentiment and Entity Detection Function
To keep things simple, and so that. we can see a clear delineation between our API code and our NLP code, we can create a single function that perfroms the NLP-heavy lifting for our new applications.
Taking the entity extraction and sentiment detection samples from above, we can create a combined which does everything in one go. The following code segment will receive text to the function, and run it through both the Spacy and Flair models:
from typing import Tuple, List

from typing import Tuple, List
from flair.models import TextClassifier
from flair.data import Sentence
import spacy

nlp = spacy.load("en_core_web_sm")
sentiment_model = TextClassifier.load('en-sentiment')

def get_entities_and_sentiment(text: str) -> Tuple[dict, List[dict]]:
    """Parse a string, and determine sentiment polarity and entities contained within"""
    doc = nlp(text)
    entity_list = [
        {"name": x.text, "type": x.label_} for x in doc.ents
    ]
    sentence = Sentence(text)
    sentiment_model.predict(sentence)
    label = sentence.labels[0]
    sentiment = {'sentiment': label.value, 'polarity':label.score}
    return sentiment, entity_list


# Run a small test
if __name__ == '__main__':
    # We're testing if our sentiment and entity function is working correctly:
    result = get_entities_and_sentiment("I travelled to New York and I hated it.")
    print(result)
We can place this new function in a new file called get_entities_and_sentiment.py which we can import in our API code which we’ll see in Part 2 of this tutorial.
Running this file on it’s own as a test, will output:
>> python get_entities_and_sentiment.py

({'sentiment': 'NEGATIVE', 'polarity': 0.9999203681945801}, [{'name': 'New York', 'type': 'GPE'}])
Adding the NLP code to a FastAPI App
The next step is to integrate our text-processing function above into an API, that is, to expose the functionality to the internet via a web framework.
You can see how to set this up in Part 2 of this tutorial (coming shortly).